


Welcome back! So a lot has happened since the last time I posted a work in progress, but here it is: Part 2 of Hornet's head/helmet thing.
Here's what we covered in Part 1: creating the 3D model and creating the paper pattern. In Part 2 we will cover creating the foam template, gluing it all together, making the horns detachable, making the inner cap, main helmet closure, sealing/priming/patching/painting, and installing the eye mesh. Buckle in, here we go!
Creating the foam template
So admittedly I do not have any pictures of this part however it is really easy. The cardstock mock that I made became my foam templates. I took a sharpie and put lines where I wanted to separate the model to become my template. The key here is to draw lines that will allow for the pattern to lay flat and try to have as few pieces as possible since that is less seams to fill later.

Here is a sketch of the lines that I drew on my helmet. The dashes that are across the lines are called registration marks. These are used to know that you are matching the two pieces of foam in the right spot. This goes a long way in making sure you get the right shape, so don't skip this!
Not all pieces need to be cut all the way through to lay flat. For example, you can see that I placed a smaller line around Hornet's cheek to create a dart. These are very helpful for areas that are particularly rounded like this section of the helmet is.
You only need to draw lines on half of the mask (if it's symmetrical) so I just did this on one side. Now you can take your scissors and cut on your sharpie lines. Now you will use these to lay down on your foam. Trace around the edges and make sure to transfer your registration marks on to your foam. I used 6mm foam from TNT Cosplay Supply for the helmet since it was thick enough to hold its rounded shape but not so thick it would be difficult to curve.

You will need to flip over each pattern piece if you only cut out half. This will mean both sides are the same!
The last piece you will need is an inner piece to attach magnets to both the head base and the end of the horn. I did this after the horn and base head were glued to make it a perfect fit but you could take your paper pattern of your first horn and trace the inside shape of the horn onto eva foam at this stage. Alternatively, what I did was put a bunch of tape across the hole of the base of the head and traced the opening with a sharpie onto the tape (new pattern piece).
Gluing It Together
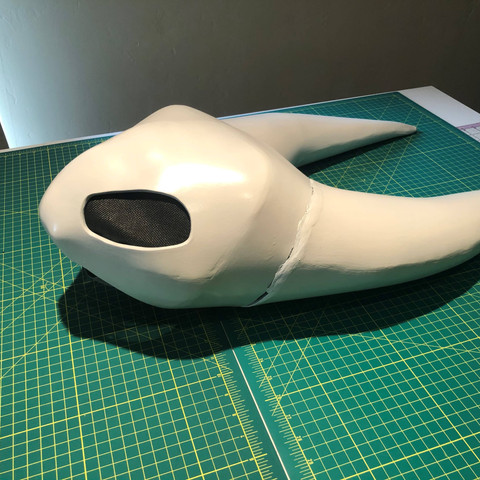
Here's the part where it starts to come together! For the horns you will need to heat form them a little to make them easier to glue together. Take you heat gun and gently heat up the horn. Then roll the horn in the direction you need it the piece to curve and hold for a few seconds until it cools. Now apply a thin layer of Barge cement to each edge you want to join. After a few minutes the Barge will be dried and you can begin to carefully glue these pieces together. You want to match all those registration marks you made earlier and you will get something that looks like this:

Making the Horns Detachable

I wanted to make the horns detachable for storage since the length of the horn is ~16 inches. To do this, I used a number of n52 neodymium magnets to hold the horns in place.


You can see here that I added an inner foam piece which was not in my pepakura design. After you make the horns, take some painters tape and lay it across the opening. Take a sharpie and trace out the inside edge of the foam piece. Now you have a template of that opening. Cut 2 (1 for each horn) and glue on the inside of the horn. I then dremeled holes, the size of my magnets and super glued them in
If you dremeled a hole into your foam, put a piece of painters tape on one side of the foam. Then put in a big glob of super glue, then the magnet, then another piece of painters tape. This keeps your fingers clean and you can keep working while the glue sets.
Making the Inner Cap
The inside of the helmet needs additional support to keep it up. The main cape is made with EVA foam (6mm) and the only other stuff you need is Plastic wrap, duct tape, marker, wide elastic, E6000, and Barge.
Here's a break of some words and here's pictures:
[1] Cover your hair

[2] Plastic wrap

[3] Duct tape
[4] Cut down the middle and cut some darts to lay flat

[5] Transfer to foam and glue together

[6] Attach elastic with E6000 glue

After the cap is complete, you can put it on and put the main helmet on. Figure out where you need to glue the cap on the inside and barge it together. I placed it so the bottom of the head would rest on my chin. This helped elongate my neck to match the proportions.

If your head is a little too big with the cap for the inside, you may get a bump where you glued your cap from the inside. This is no problem! All I did was take my dremel tool and slightly sand down that area to get it to be a little flatter.
Main Helmet Closure
So I kept the bottom opening of the mask pretty small to get that nice curve along the bottom. I didn't want it to look like a motorcycle helmet which made the opening at the bottom smaller than I could fit my head through (pesky noses!). To deal with this, I made the helmet open from the back and velcro shut. Most people don't take pictures of the back of cosplays anyways so it was the perfect place to put my opening.

One side of the white foam piece is glued to the helmet and the other is velcrod in place by an overlapping piece that extends to the inside of the helmet.

This allows me to pull open the helmet enough to slide my head inside and pull the elastic band under my chin.
Patching/Sealing/Priming/Painting
Patching was done with both foam clay and kwik seal. The foam clay was used both to round out the tips of the horns and add some bone growth texture at the seam of the horns to the base of the head. With the foam clay, I needed to wait roughly 48 hours for it to fully dry before I refining the shape with my dremel. To cover the seams, I used kwik seal plus. It took 2-3 thin coats to fully patch the seams. I used a popsicle stick to push the kwik seal into the seams and scrap off the excess.
You can use toothpaste tube squeezers to get the most out of your kwik seal tube! Just roll it up to to push all the caulk to the top. This is the one I use.
For sealing I just did the standard heat sealing with my heat gun. Turn it on high but hold it further away. The foam will get a little shiny then you know the foam is properly sealed. Honestly, with the primer I used, it wasn't necessary (only heat sealed the helmet and the horns were untreated).

Priming was done with using Prop Monkey Studio's rapid fill and fine finish. This was the first time using the product and I really like it. I like it because it is sandable which helps get the really smooth finish that you need for this helmet. I brushed on 3 coats of rapid fill, then sanded with 320 grit sandpaper. It sands really easily so I had to be careful not to sand all the way through. Then I applied 3 layers of fine finish with a brush. I wet sanded this with 400 & 600 grit sandpaper and got a really smooth finish.

Painting was done with a white enamel spray paint and a matte clear varnish. I didn't put a perfectly even coat on the helmet to get a bit of a speckled effect in some areas to make it look like clean bone. Since there isn't any weathering to do, I felt this helped make it look interesting up close.
Installing the Eye Mesh

I ordered the same material that fur suit cosplayers use for their mascot heads from Etsy. If you can buy it in small quantities it is a high density window screen. It has great visibility and you can't see my face inside. However, due to the design of the helmet, I have a blind spot directly in front of me but I can see just fine out of the mesh.
I decided not to permanently glue it inside just in case I needed to replace it or do any major paint touch ups. So instead I used 3M VHB tape in the color clear
Finishing Touches
To hide my chin from tall people looking down my collar, I used a light weight balaclava ski mask to cover my neck and chin. To further this effect, I lined my collar with a non-shiny black broadcloth.
Done!

Now the helmet is complete and next time I will have a full write up on Hornet's needle! If you have any questions about this process, feel free to email, comment, or send me a message on Instagram (@hnebadger_cosplay).
Have suggestions on topics to cover? Email me
I'd love to hear from you
Want to help support the site?